Sunday, December 7, 2014

December Daily Album 2014 Finished Cover and Cover Page

Hell Everyone, Here my finsihed December Daily Album finished. I added red and green sheer and felt ribbon from my stash. I cut out and glued 6 of the same numbers and alphabets to create a chipboard look. Quickutz I used on the cover: 25= Quickutz Classic Venus, Days= Quickutz Vixen, Of= Quickutz SnowDay, December= Quickutz Emily and 2014 on the side = Quickutz Metro. I also used some Quickutz Holy rubon and placed them behind the 25.


The cover page is vellum inside a page protector. I punched out some stars from the same die I used on the cover out of gold paper and glued two together and placed an elastic. Again the  I cut out and glued 6 of the same numbers and alphabets to create a chipboard look. Quickutz I used are: Hello= Quickutz Deck the Halls, December= Quickutz Holiday and 2014= Quickutz Classic Marisa. I did the same on the other side but cut the letters out backwards.  


Thank you for visiting
Veronica ;)

December Daily Album 2014 Cover Prep

Hell Everyone, for my 2014 December Daily Album I used another Snap Simple Stories red album and colored the cover with Martha Stewart Metallic Gold & Glitter Carnelian Paint. What I did first is cut out some Quickutz stars out of vellum and then painted them on the album a few sections at a time. I started by painting the cover with gold paint a few sections at a time and then painted each star as I went on. Instead of using glue to do this decoupage I used the paint as glue and I love how it turned out. I then painted the entire album with another layer of gold pant and then added a thin layer of the red glitter. I hope you enjoy this procedure.


Thank you for visiting
Veronica ;)

Sunday, November 30, 2014

December Daily 2013 Album and 2014 Supplies

Hello Everyone, I had finally uploaded my finished 2013 December Daily Album onto YouTube to share with you all. I have also uploaded a video showing you some of the supplies I hope to use on my 2014 December Daily. 


Thank you for visiting
Veronica ;)

Tuesday, October 14, 2014

Copic Markers Online Class Day 13- Having Fun

Day 13 and Final Class of my Online Card Class: COPIC Markers for Card Makers- Having Fun

I ordered this Santa Stamp from C. C. Designs to created my last card for this class. I received it in today's mail and I couldn't wait to get home and color him in. I was so happy with the end result. I had to play around with some colors to get the right shadings.


Here is a list of supplies i used for this card: 
  • DCVW Stack- Shimmer Cardstock
  • C. C. Designs Rubber Stamp: Roberto's Rascals Santa's Ride
  • Scraptastic December 2013- Home for the Holiday's Stamp Set
  • Quickutz Deck the Halls Dies
  • OCD- Tidy Twine- Christmas
  • Hero Arts Embossing Powered- Silver
  • EK Tools 3D- Dots 1/16in Thick
  • Glossy Accents
  • Wink of Stella
  • Gelly Roll Pen- Clear Star
  • Copic Markers: 0,C0,C3, C5, C7, C10, E00, E11, E41, E43, E44, RV02,R20, R22 R29,B02, B04, YG05, YG07, YG09, G21, G24, G28, W0, YOO, Y08


Thank you for visiting
Veronica ;)

Sunday, October 12, 2014

Copic Markers Online Class Day 12- Storage

Day 12 of my Online Card Class: COPIC Markers for Card Makers- Storage

When I bought my first few Copic Markers I kept them in a clear plastic bin with lid on my desk. Once I outgrew that bin I needed another storage solution for my  desk. I searched and searched and I did not find anything that would fit on my desk. I did not want to loose any desk space just to buy a storage unit just for my markers. When searching for my unit I did take in consideration that I would some day want to buy all 358 markers.

I kept all of my Stampin' Up Ink pads in my Cubeical Stackable Storage Unit on my desk so, I removed the the pads from the bottom shelf and moved them to the Storage unit on the left. I then sketched a design of the cardboard unit to fit inside the storage unit. It's not perfect but, it works for me. Each unit has 20 slots and hold 6/7 markers mostly six.

 I also created a reference sheet to go along with my unit. I drew all 60 slots and wrote down the letters and numbers for each family. I started with the E=Earth, C= Cool Gray, W=Warm Gray etc.. I store my reference sheet in a black flat pencil case along with my copic marker swatch book. Every time I buy a new markers I put a dot next to the letter/number and I can easily go and look at it when I'm purchasing a new color.   


Thank you for visiting
Veronica ;)

Saturday, October 11, 2014

Copic Markers Online Class Day 11- Hiding Mistakes

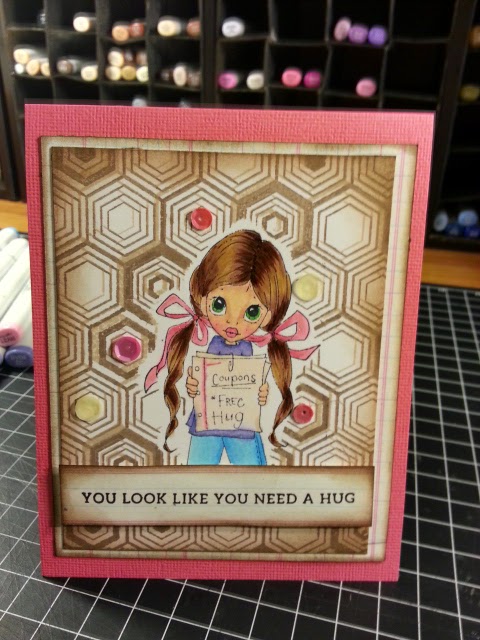
Day 11 of my Online Card Class: COPIC Markers for Card Makers-Hiding Mistakes. The end result of this card was so cute you need to scroll down to look at the finished card. I colored the Saturated Canary Fly Girl and I was think of the background before I continued coloring the broom. I ended up coloring what I thought looked like a moon at first but, looked like a tennis ball at the end. I did cut out the Fly Girl and printed a second image to color the broom. I did make a mistake and colored outside of my broom and used the colorless blender to hide it. I then stamped some cloud for the background and stamped the words Happy Halloween with Scraptastic Kit Club Stamps. I colored her bow, jacket/dress, hat and boots with Copic markers 100, C0 and 0. They looked almost like suede. Once I added Wink Of Stella it didn't look like suede anymore. I didn't put any Wink Of Stella on her boots.


Please note that I inserted the watermark Krista Smith Saturated Canary on the image because, I had not colored the image in and I wanted to demonstrate the steps that I took to complete the card. 


Here is a list of supplies i used for this card:
  • Striped Pattern Paper Company unknown- Maybe DCWV
  • Bazzill Cardstock- Purple/Black
  • Saturated Canary Digital Image- Fly Girl
  • Scraptastic July 2013 Ormolu Stamp Set (the word Happy)
  • Scraptastic October 2013 Blackbird Stamp Set (the word Halloween)
  • Scraptastic April 2014 Worth Wondering Stamp Set (the clouds)
  • Quickutz Bats
  • StazOn Ink Pad-Jet Black
  • Stampin' Up Ink Pad-Smoky Slate
  • Stampin' Up Ink Pad- Pumpkin Pie
  • Stampin' Up Marker- Tangerine Tango
  • Versafine Ink Pad-Onyx Black
  • Ranger Liquid Pearls White Opal
  • EK Success 1/16in thick Thin Foam Dot Squares
  • Adornaments Purple Fiber
  • Wink of Stella-Clear

Thank you for visiting
Veronica ;)

Wednesday, October 8, 2014

Copic Markers Online Class Day 10

Day 10 of my Online Card Class: COPIC Markers for Card Makers- Finishing Touches. I have this adorable Saturated Canary Stamp called Free Hug and I wanted to make a card but, couldn't find a sentiment to go with it. Well until now. I just received my October order from Scraptastic and I got the Sentiments Series V.1 Stamp Set designed by Kaitlin Sheaffer with the sentiment that reads " You Look Like You Need A Hug" too cute...


I think she came out great. I love all the colors I used on her and how they blended nicely. I stamped the image and cut it how to mask the image so, I can stamp the background. It didn't really turn out like I wanted the background to look but, I left it alone. I added some Wink Of Stella to her hair bow.

Here is a list of supplies i used for this card:
  • American Craft Cardstock- Raspberry
  • Crate Paper Double Sided Paper- Maggie Holmes- So Lovely
  • Saturated Canary Stamp- Free Hug
  • Scraptastic Kit Club- October 2014- Sentiment Series V.1 Stamp Set
  • Hero Arts Hexagon Background Stamp
  • Hero Arts Shadow Ink Soft Brown
  • Hero Arts Shadow Ink Cup O' Joe Mid-Tone
  • Tim Holtz Distress Ink Pad- Walnut Stain
  • Sequins
  • Wink of Stella 
  • Copic Markers- E00, E11, RV02, E35, E25, E27, RV21, RV25, BV00, BV02, BV04, B00, B02, B04, E000, E41, R27, YG07, YG09.


Thank you for visiting
Veronica ;)

Sunday, October 5, 2014

Copic Markers Online Class Day 9

Day 9 of my Online Card Class: COPIC Markers for Card Makers- Backgrounds. I made this adorable card using the Saturated Canary Elphie Digital Stamp and I printed the image 3.5 x 5. I am so happy I decided to take this class. I loved the video with Kristina demonstrating the coloring for this card. I'm getting the hang of the flicker technique It's all in the wrist.  

The sentiment Frightfully Cute is from the Scraptastic Blackbird Stamps set from October 2013. I also used some Wink of Stella on her top and leggings.  


Thank you for visiting
Veronica ;)

Copic Markers Online Class Day 8

Day 8 of my Online Card Class: COPIC Markers for Card Makers Cards Using Practice Sheet images. I Love butterflies so, I created this card using one of my practice butterflies. I Love how this card turned out, I love pink and brown color combinations so I pulled out some of my supplies.


Here is a list of supplies i used for this card:

  • DCWV Shimmer Stack-brown
  • DCWV Mariposa Stack
  • Club Scrap a 2005 sheet of cardstock
  • Craft-too- Embossing Folder-Sweet Flowers
  • BossKuts- Framette Die
  • Scraptastic- We Are Family Clear Stamps-September 2013
  • Stampin' Up!- Early Espresso Ink Pad
  • Tim Holtz- Distress Ink- Picked Raspberry
  • Hero Arts-White Embossing Power
  • Ranger- Rich Red Embossing Folder
  • Wink of Stella Pen
  • Copic Markers- RV02, R35, R89, E13, E15, E79


Thank you for visiting
Veronica ;)

Wednesday, October 1, 2014

Copic Markers Online Class Day 7

Day 7 of my Online Card Class: COPIC Markers for Card Makers working difficult colors. I didn't have the right colors to practice with but, I did use what I had. I will be picking up some of those reds and greens as well as that 100 marker and some of the W's that Sandy used on this video. I love the bonus video where Sandy answered a few questions on the forum and demonstrated the flicking motion. This was better on my wrist.


Thank you for visiting
Veronica ;)


Monday, September 29, 2014

Copic Markers Online Class Day 6

Day 6 of my Online Card Class: COPIC Markers for Card Makers working with the colorless blending marker 0 plus coloring animals and texture. My colorless marker did not work like I wanted it too. I think it's a little dry and it's a brand new marker. I have to pick up some refill. I really enjoy the techniques demonstrating the blending with the colorless marker. It gave a different look compared to the shading technique which was a softer look compared to a more shadowing look.


Thank you for visiting
Veronica ;)

Sunday, September 28, 2014

Copic Markers Online Class Day 5

Day 5 of my Online Card Class: COPIC Markers for Card Makers was Coloring Skin, Hair and Clothing. I only tried one skin and hair techniques and it was easy. I need to practice with different color skins and hair.


I tried the first ballerina and I shaded her face to dark and I didn't like that look so, I moved on to the next ballerina. I didn't really like the color combination I used on her hair. I'll keep practicing on that. The shading in her dress and ruffle was not was I expected either.


Once again I love this next technique that I learned from Sandy and it was a great challenge. Trying to color an African-American Girl was a challenge because, I did not have the colors. I had to improvise and pick a few colors that I had to practice along Sandy's video. I love the end results.


Thank you for visiting
Veronica ;)